I am loving all the Facebook posts by new teachers who are spending the days before their first day of school, decorating their new classrooms.
I remember the excitement… the sleepless nights… I remember how I got my (then) little sons involved in taping down nametags, labeling notebooks. Even my niece spent time working on my bulletin boards.
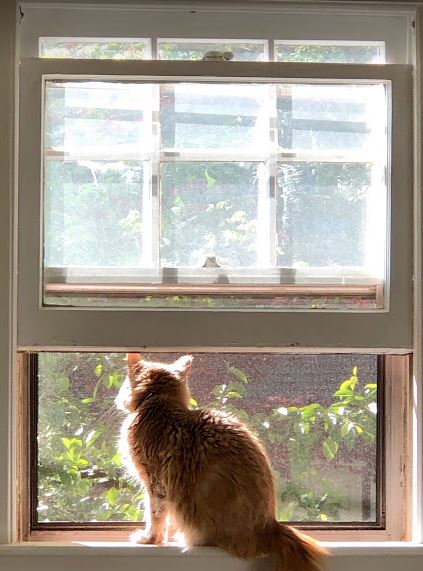
When my position was transferred from the basement of a synagogue to a modern office style building, one of the first things I noticed about my new classroom was the bank of amazing, huge, bright windows that ran the entire length of the classroom. There was a perfect windowsill the length of the room – not a radiator, or something else that couldn’t be used as a shelf. AND the window faced out into a sea of greenness: a woodlot, with a stream, and a field beyond. I was in heaven.
Great windows allow the outside, in, so students can be nature observers from the comfort of their own desks. {Image Credit: (c) 2014, Kim M. Bennett}
Fast forward to the present, with a lot in the news about safety, in schools and other public settings. Those beautiful windows don’t open. At all. And there is only one way in and out of the room. Add the fact that the windows run the length of the wall, which means that there’s no “blind spot” for students to stay out of view from the outside.
I’m thinking hard about what to do this year with those windows. Here are the pros and cons of covering/not covering my windows.
Sunny, uncovered windows are a blessing to some – and a distraction to others. My kitty prefers the sunny side of the street. {Image Credit: (c) 2019, Kim M. Bennett}
Let the Sun Shine In! Don’t Cover Them…
As quick as I can write them, here are ten reasons I’d want to leave my windows uncovered:
Natural light is free – overhead light is not;
Natural sunlight tickles your brain in a way that man-made lights never will – a plus when you’re working with kids who have troubles with depression, anxiety and other mental health issues;
The abundant light enables us to have an extensive collection of houseplants on the windowsill – the kids enjoy taking care of them;
I personally feel better when I can see sunlight and green things out the window;
One of my kids, when he’s overwhelmed, stares out the window at the solar panels in the distance (true fact);
I don’t want to spend money and time putting up curtains;
Some of my kids will pull the curtains down if they get upset;
We can watch the neighborhood bobcat, deer, rabbits and other wildlife through our window;
Science has shown that being around greenery and nature makes kids feel, and do, better in school;
We can conduct nature studies from the window, when the weather (or the kids’ behavior) is not conducive to going outside;
(a bonus) The fire marshal sometimes has rules about hanging things in classrooms. I don’t know those rules.
This is just my brainstorm – are there things you might add to the list? (I have already thought of three more…)
Science has shown that being able to view greenery has a positive effect on human beings, especially children. {Image Credit: (c) 2018, Kim M. Bennett}
Put a Covering Over Those Jokers…
Okay, so now for the cons of those uncovered panes of beautiful-ness:
There’s sometimes sun glare on the Promethean board, especially when we’re watching a video;
Some districts have safety rules about when and why to cover the windows, to prevent people from seeing into the classroom from the outside;
Kids seated next to the window sometimes roast in the sun;
Some students have a hard time focusing if it’s snowing/raining/sunny/cloudy/ etcetera, and they can see it through the window;
When a student is “out of program,” the students can see through the window;
Some students think it will look more “homey” with curtains;
The computer hook-ups are along that wall – so students at the computers are also facing the open windows, which sometimes causes eye strain;
If my classroom were on the other side of the building, students could see the parking lot, basketball court, police cars/ambulances (an occasional occurrence at our school), visiting parents… potentially causing a disruption;
Likewise, students would focus on which buses were there at the end of the day;
The curtains would break up the expanse of office-white wall that we can’t paint.
What are some reasons YOU might cover the windows?
Windows allow people to see the outside – but also allow people on the outside to look in. {Image Credit: (c) 2017, Kim M. Bennett}
The Verdict on Window Coverings… at Least for This Year
I have to be honest: it was hard for me to come up with ten reasons to put up curtains or other window coverings. I also must admit that, for the 20 years my husband and I have been married, we’ve been on opposite sides of the window covering argument (think “Everybody – look at me!” vs “blind cave dweller”). So I know I’m probably projecting a lot of my own needs onto this decision. Oh, well – I’m human.
Last summer, I put up colorful valances, and my ed assistant (who is the decal queen), put up cute decals with affirmations that she bought at the dollar store (so if kids pick them off, it’s not a big deal). We filled the windowsill with plants. We enjoyed our bobcat friend (whom my colleague is trying to videotape with a motion-sensitive camera she’s installed in the woods).
I DO think I’ll see if I can get some translucent shades installed so that we can get better optics on our Promethean board. But that sounds expensive to me, so I’m not going to hold my breath waiting for it. And I’m going to collect data to back up my request.
I COULD put up another set of tension rods and hang sheers. That’s an option. But I really DO like the green view. Here you can see it…
The amazingly green view out of my classroom window – and the cute window treatments we installed last summer. {Image Credit (c) 2018, Kim M. Bennett}
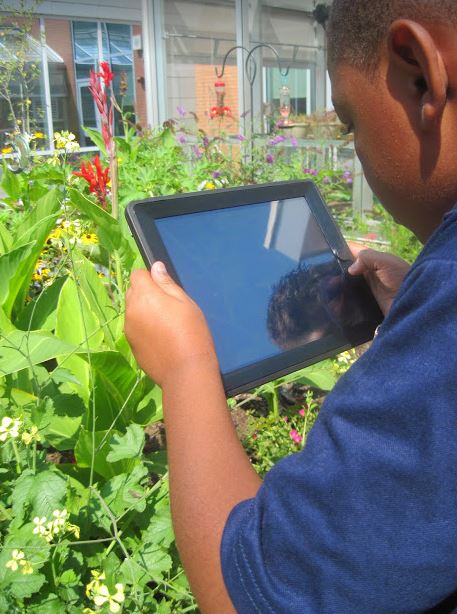
From the time they were born, they’ve held some kind of electronic device in their baby hands: a cell phone, a remote, a game console controller… Their classrooms, likewise, are full of technology that the rest of us never even dreamed of, including interactive white boards, document cameras, digital recorders and web cams, and 1:1 Chrome books and iPads.
Many of us charged with teaching said students with said devices are, unfortunately, technology immigrants. We may have assimilated well (or not) into the world of technology, but it doesn’t come second nature to us. Consequently, there are many of us who use our Promethean board as simply a tool to project videos while the kids eat snack.
And, of course, there is a growing anti-technology movement, based on the very clear evidence of some very real, and detrimental, effects of excessive screen time to the minds, bodies and spirits of kids and adults.
It is safe to say that the digital world is here to stay. There is no doubt that electronics, today, bring many benefits to our lives: the digital mammogram I just had is instantly readable by all of my doctors; my cell phone and a Roku app replace the TV remote that died because it sat in water on the coffee table; the music from my Pandora account streams live to two Onyx speakers in my house, so I can clean and listen to Bonnie Raitt at the same time; I can look on my laptop to see who came to my door at home, while sitting at my desk at work.
In what ways will I use technology to enhance my students’ lives and learning this year, while making sure that they live balanced lives, in the process?
Technology Tools in Today’s Classrooms
There is an amazing graphic that’s been around for a number of years, which shows about a zillion (okay, that’s an exaggeration) apps that correspond to Bloom’s Taxonomy. Perhaps you’ve seen it?
iPad apps can be effective and modern ways to address all of the levels of Bloom’s Revised Taxonomy.
My students prefer to have real textbooks, but they are much more engaged when I incorporate interactive technological tools into my daily lessons. The “menu” above is a good start, but there are now so many more!
What’s on My Technology Menu for 2019-20?
Here are the apps and websites I’m using with my students this year:
Language Arts
Old Standby: ReadWorks: I have used this free website to download leveled articles for all subjects for a number of years. Last year, I began using some of the other features as part of my explicit instruction in language arts.
articles have an option be projected onto my Promethean board for whole-group lessons
the Article-a-Day feature can be used to build background knowledge on a new topic with my students
I can rotate through a number of articles on the same topic, on different Lexile levels, through the course of the week, so students can apply learned skills to increasingly difficult texts
the comprehension questions can be sorted by question type, for monitoring IEP goals and objectives
there are question sets for specific skill areas (e.g., Author’s Purpose questions, vocabulary questions)
This summer, I used ReadWorks articles to assess Oral Reading Fluency as well as Silent Reading Fluency, once a week for all students on my caseload. One downside to ReadWorks is that there are fewer articles at the higher Lexile levels. Enter my new favorite literacy site…
ReadWorks offers many options for teaching reading instruction to students of all levels. {Image credit (c) 2019, Kim M. Bennett}
My New Favorite: Newsela: Like ReadWorks, Newsela offers leveled passages for students to read, and comprehension questions to answer. This summer, I set up a free version of the account, and invited my summer school students to participate. While we considered and declined to purchase a PRO account (it was pricey), the free version was well-liked by my students, and will become part of our regular instruction this coming year.
students can control the readability of the text in real-time, and see the changes when they adjust the Lexile level
they can monitor their own progress, and have learned how to choose a “just-right” level, or a challenge level, by viewing their “binder”
there are more selections at the higher reading levels than in ReadWorks
there are fewer questions at the end than with ReadWorks
by logging into the students’ accounts, I can see their overall progress, as well as sort their data by question type (NOTE: with the PRO version, there is a teacher dashboard, but not with the free version – so I make it part of my conference with the student to log into their account with them)
Newsela is a useful learning task for independent work during the literacy block
In Newsela, students can monitor their progress in their “binder.” Green dots represent articles read where the students scored at least 75% on the response quiz. {Image credit (c) 2019, Kim M. Bennett}
Have to Try: Last year, I struggled to teach literary themes to my students, until, out of desperation, I began playing popular music for them from YouTube videos. Students were quickly able to identify the theme when it was embedded in music.
A colleague introduced me to Teach Rock, which has over 150 lesson plans and 16 units of study for teaching literary ideas through the study of popular music through the ages. We dabbled with it this summer, and I’m working it into my Language Arts work for the school year. Stay tuned!
Tools to Use: I have a handful of students who struggle with writing, either because they have difficulty spelling the words they want to use, or their physical writing process is slow and laborious. I introduced them to Windows Speech Recognition, which comes free with your Windows OS. You simply go into your settings, under Accessibility features, and activate it, so it runs in the background. With a command, it turns on, enabling students to speak their written responses. Early results show that the students are interested. NOTE: as with the voice commands on your phone, it does take time to learn how to talk so that the computer understands you, and to train the computer to understand your voice. I advise assigning particular computers to particular students, to help with that.
Windows Speech Recognition runs in the background, and can be activated by voice, to enable speech-to-text accommodation for students. {Image credit: (c) 2019, Kim M. Bennett}
Mathematics
Old Standby: I have been using Khan Academy with students (including my own homeschoolers) for years now. Many of you probably have, too. Khan Academy is free, and is especially strong in the area of mathematics, although this summer I started using the computer courses for students who needed a technology class for graduation.
Khan Academy offers high-quality, customized learning paths for students of all grade levels.
students can be assigned individualized work to meet IEP goals and objectives
students can be assigned re-teaching work, based on their grade-level assignments
Khan Academy can be used as an anchor activity, while you work with a small group on other skills
I have had students use Khan Academy outside of school, toward credit recovery
users can log in anywhere – helpful when kids are homebound, hospitalized or absent for any reason
there are initial quizzes that help determine a starting place, then a course is charted for the student
I have also used Khan Academy as part of an enrichment group in an elementary setting
Some students find that there is too much reading involved – this can be a barrier for students with reading difficulties.
Tools to Use: One of my teens has difficulty subtracting with regrouping, and I didn’t have base 10 blocks in my summer school tools. I discovered virtual base 10 blocks that I can use on the Promethean board at CoolMath4Kids. The kids love using the virtual manipulatives on the board – check out their site for more manipulatives.
There are a number of places where you can access virtual manipulatives. This is CoolMath4Kids. {Image Credit (c) 2019. Kim M. Bennett}
Science & Social Studies
Old Standby: I have a free account to Kids Discover, which has thousands of online articles, units of study and infographics, on high-interest topics of current interest, with built-in interactive parts. You can use the articles on your interactive white board. Every week, you’ll get access to a selection of free topics – more than enough to use for your entire curriculum, if you’re a homeschooler. My teens in my CDT class like it for a change up. There is a paid version, but I have not used that one.
useful for current topics (to supplement your regular curriculum with timely articles)
could be used for independent reading assignments
texts are high-readability for most high school students
colorful, interesting layout
Kids Discover is a handy supplement to your science or social studies curriculum, offering high-interest articles on current topics. {Image Credit (c) 2019, Kim M. Bennett}
Have to Try: My assistant shared the website Recyclebank with me. All of the articles are geared toward green living, health, ecology and the environment. The articles include links to high-quality, non-fiction articles from good sources, such as the Department of Environmental Protection or the USDA. There are fun elements, such as the Question of the Day. Reading articles and taking quizzes earns points, which can be redeemed for magazines and other items.
I like to have online current events sites that we can explore without a set assignment. I plan to use this site to teach kids how to efficiently explore and evaluate online sources, and to teach them how to build a reading log using online sources.
Earn points to use for rewards while you read articles on healthy lifestyles, green living and ecology, on Recyclebank. {Image Credit: (c) 2019, Kim M. Bennett}
One “old standby” which I’ve used as a homeschooler, but which I will start using this year, is Journey North, a nature-based, citizen-science website. In a survey of possible topics of study, my students selected “nature walks” and “nature study” as preferred topics. One of my students recalled using a bald eagle “nest cam” in his middle school class. Again, stay tuned!
Tools to Use: Over the summer, I’ve been experimenting with a number of digital tools and looking for ways to incorporate them into my instruction, in an authentic way.
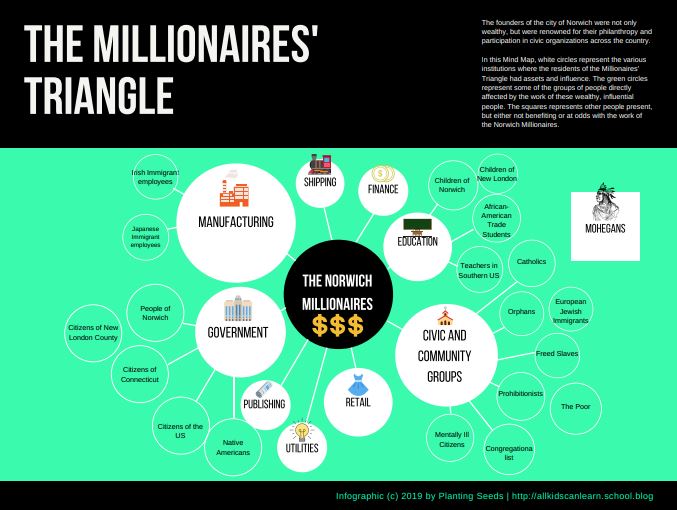
I am fiddling around with creating infographics in Canva, using the free service. It is a powerful app, but with that power comes a lot of information. I created a circle map about the influence of the Norwich Millionaires, and I’m thinking that we might practice this one type of graphic, using Canva in our US History class to continue to emphasize similar relationships in history.
Canva is a powerful tool for creating infographics and many other graphics, like this one on the influence of the Norwich Millionaires. {Image Credit: (c) 2019, Kim M. Bennett}
One app that I’m planning to use to organize my classroom presentations is Sutori, another powerful digital tool, even when using the free version. I used the free version to create a timeline presentation of the early history of the city of Norwich, Connecticut. I feel it could be a great way to organize lesson materials, and will experiment with this in the coming year (see the linked blog post for a discussion on the use of Sutori to organize unit materials).
Teacher Tools
Old Standby: For the past several years, I have used a paid subscription to PlanBook Plus . It takes a little bit of time to enter plans if you use all the fields (I personally like to include the grade-level standards, and related standards from the students’ IEPs, in the plans), but I don’t mind that. One thing that is handy about this digital planbook is that I can pull it up from any device (including my phone), and that I can move lessons forward if something happens and I don’t get to something on a given day.
In the past, I included the instructional sequence for lessons in PlanBook Plus, but, this year, I think I’ll just put the “big” items (lesson title, textbook reference, standards), and leave the details for my written, daily planbook, since these might change.
Have to Try: As a special ed teacher in a self-contained classroom, in an alternative setting, I collect a lot of data, for a lot of classes, in addition to progress monitoring data. I have asked my principal to purchase a subscription to the Daily Cafe with CC Pensieve, which is a web-based data collection tool that can be used for conference notes, reading assessment data, science quizzes, and just about any information that I might collect. Because all the data is in one place, it is easy to print out a report in real-time for a PPT or a conference. It also helps me plan a workshop, or “cafe,” model for literacy and numeracy instruction, something which I experimented with at the end of last year and which the students liked, as they felt they were busier and got more individualized attention.
The Daily Cafe (for literacy and numeracy) was originally designed for use with elementary students, but is increasingly adaptable to struggling readers in the middle and secondary grades. {Image Credit: (c) 2019, Kim M. Bennett}
Technology Tools in Your Classroom
What are your go-to tech tools, apps and websites? Share the “best of the best” below, in the comments section!
In schools across the country, come September, all students will be sitting down for a 45-minute writing prompt. It will be about something predictable: a fictional narrative for third graders; an informational piece for fifth graders; a persuasive essay for eighth graders..pe. Preparing students for these quarterly or monthly prompts is a major focus for most language arts teachers.
What is often missing in writing instruction is explicit instruction on how to compose high-quality written responses to questions across the curriculum. The work we do to help students write narratives with elaboration, or explanatory texts with excellent use of citations, or a well-developed argument, doesn’t seem to translate into well-written responses to questions in their biology textbooks, or even their responses to literature in English class.
This summer, I spent six weeks teaching my students how to analyze question types (recall, explanation, application, synthesis, analysis, evaluation) based on the book, Because of Winn-Dixie, and how to craft well-structured responses that show their understanding of what they read.
These 8 steps to better written responses can be used with any age group, in any subject. {Image credit: (c) 2014, Kim M. Bennett}
The State of Written Response Work: Our Baseline
On the first day of school, I assigned an easy reading passage (so the students could focus on their comprehension questions, rather than decoding). Here is a typical response, which earned zero points using my 10-point writing rubric:
Atka and the other socialized wolves at the center are not afraid of people. Why are the other 19 wolves at the center afraid of people?
“So they can go back into the wild.”
{Student J, Grade 8}
I set out to develop an instructional sequence which would help students to analyze the question being asked, determine what was essential information to include in their response so that the reader could understand the answer and to show understanding of what they read, and teach them how to check their response to make sure it had everything it needed to be excellent.
Steps for Writing a Good Response
We used the four areas of the 10-point rubric as a guide for analyzing the question and constructing an answer.
Step 1: Listen to the question.
Students follow along as you read. Most writing prompts allow the teacher to read the prompt aloud, to ensure that students are clear about the task. Remember – you have already read the book. This task is to assess understanding of the text – not the words of the question.
Step 2: Determine how many parts your response should have.
Next, students analyze the task, to determine how many parts there should be to the response. Underline the parts that require a response.
Hint #1 for finding “parts:” Look for the question mark – read that sentence. What do you have to do to answer it?
Hint #2: Look for other “direction words” in questions without a question mark: describe, explain, list, explain…
Step 3: Identify 3-4 words to include in your response.
Students should then circle 3-4 words in the prompt that they want to use in their response. They might try to circle words like the or because, since they are common words. Ask them what are the MOST important words in the question.
Hint #1: Who or what is the question about? Circle those important words or names. Without this, it won’t be clear who you’re writing about. In my example, above, it isn’t clear if “they” refers to “Atka and other socialized wolves” or “the other 19 wolves.” So, students might circle the words “other 19 wolves.”
Hint #2: What is this question about? In the case above, the question is about why the non-socialized wolves are afraid. So students might circle the word afraid.
Don’t hurry this step. While we often tell kids, “Circle words you might use in the answer,” we don’t usually spend a lot of time helping students analyze what the prompt is really about, and what the essential words are to a good response.
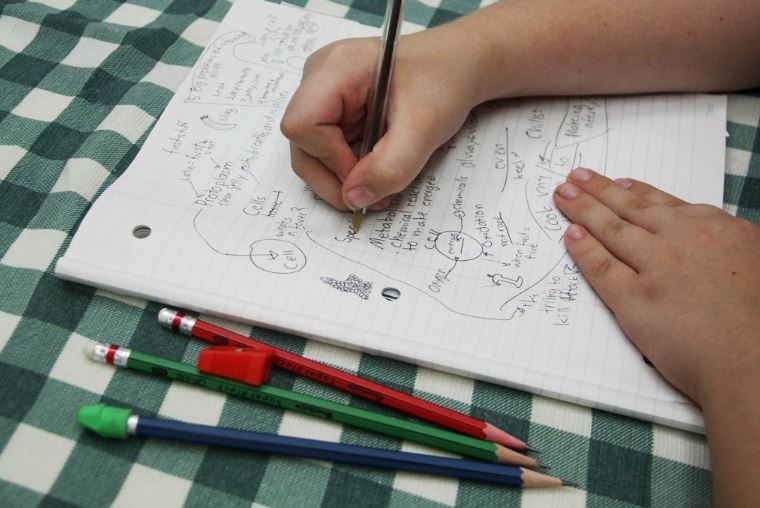
Help students analyze the question and plan their responses by selecting critical vocabulary and brainstorming ideas. {Image credit: (c) 2019, Kim M. Bennett}
Step 4: Plan at least 2 ideas to include in your response.
I don’t know about your kids, but mine don’t have the habit of thinking deeply about a question before they answer it. This step helps everyone review (and better understand) the text before writing a response, and helps them orally rehearse the words and phrases they might use.
Hint #1: I project or write the question on the board, and show students how to write marginal notes around the question. I draw lines to the parts of the question a word or phrase goes to. I stop when I have a handful of ideas.
Hint #2: Before I move on, I ask the kids each time, “Do you have to include ALL of these things in your answer?” And, of course, they say, “no.” Then I ask them, “How many ideas would be in a good response?” And they have learned to say “two,” unless the question states something different.
Some of my kids worry about finding THE correct answer, and struggle when the question just isn’t that kind of question. So this step helps them learn that there are multiple ways to correctly answer the question.
As my kids got better at this step, I added the part where I told them to make sure that their ideas went together well, and modeled that with them.
Step 5: Find at least one detail from the text to support your ideas.
While the ideas are still on the board, I change the color of my pen, and write down specific details from the text to support a few of them, as the kids generate them.
Hint: This is a good time to review the proper use of quotation marks for direct quotes from the text.
Step 6: Compose your response.
By this time, some kids will already have an idea how to respond, and will be starting to compose their answer. Give them five minutes or so to put their answer together.
Hint: Let kids orally rehearse their answers with you before they write them, if needed. One of my students leaves words out of his responses, so if he rehearses with me first, I can tell him, “I’ll say what you said – check your answer and see if that’s what you wrote.” Then I show him how to use a carat to insert words – don’t worry about re-writing.
Step 7: Review your rubric.
Before we share out, I direct students to review their rubric and check their answer:
Did you answer all parts of the question?
Is your information correct?
Did you include important words from the question in your answer?
Did you capitalize the first letter and use an end mark at the end of each sentence?
Usually, they realize they have to edit when they get to the last bullet point.
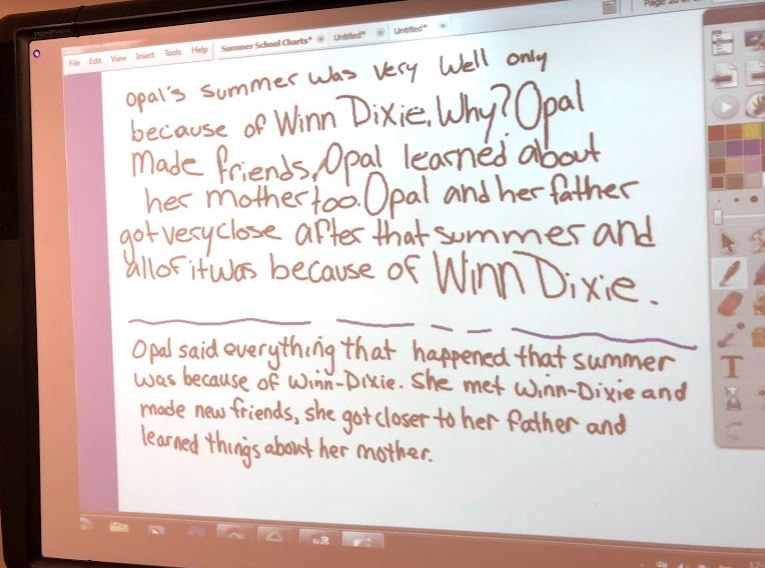
Share adult models as well as student models of successful responses and discuss as a group. {Image credit: (c) 2019, Kim M. Bennett}
Step 8: Share your response.
To show students how there are multiple ways to answer the same question, I like to have two students come up and share their responses on the board.
Hint #1: Review the rubric quickly, as a group, so students can analyze the response.
Hint #2: Identify places where the student added something to their response to take it from “good” to “great.”
Hint #3: If the response needs work, invite students to suggest ways to take it from “good” to “great” – talk about sentence combining, word choice, style – whatever comes up.
Written Responses: Our Finished Work
By the end of the six-week period, the students’ response work was much more well-developed. Here is an example at the end of summer school, by the same student as the previous example {underlined words were words the student selected for his response}:
Opal describes her friend Gloria as the best adult she knows. In what ways does Gloria act like the mother that Opal doesn’t have? How do Gloria’s qualities bring Opal closer to her real mother?
“Gloria has mother-like qualities, and she gives them to Opal. Some of them are that she gives Opal hugs, and she gives her good advice. Opal and Gloria cook together, too. She also talks about her mistakes. For example, Gloria showed Opal a tree and that tree had beer bottles and whiskey bottles, and she told Opal she used to drink. Gloria has Opal thinking about her own mom.”
Who Benefits From This Explicit Instruction?
My group, as yours, is a group of students with diverse learning needs. Here are some of the specific learning needs that this step-wise instructional sequence addressed with my kids:
Timelines are a powerful way to teach historical information, in any content area. Experts on teaching history have identified five ways that the use of timelines helps students master important historical ideas:
Information is presented in a historical context, instead of isolated facts;
Ideas are connected to one another, enabling greater understanding of bigger historical themes and movements;
Students develop the background knowledge necessary for engagement in deeper analysis and discussion;
Students see the sequence and timing of events, understanding how one event contributed to the ones that follow;
Timelines provide a structure for organizing information, making it easier to learn and remember.
Digital Timelines
Many teachers create timelines from strips of paper or sentence strips, adding events to the timelines as they come up during instruction. In this post, we will review how digital timelines can be created and used by teachers and students to teach, learn and respond to historical ideas, by students of all abilities.
There are many free digital timeline apps available. This timeline was created using the free version of Sutori, which creates a number of types of presentations, called “stories.”
Digital timelines have advantages over the paper wall version most of us are familiar with. Most importantly, they invite direct use by students. A wall timeline can be referred to by the teacher, or used as a resource by the students. A digital timeline, however, can be directly manipulated by the learner, via any electronic device. Secondly, because they are digital, a variety of media can be embedded or linked to the timeline, including teacher notes, PowerPoints, images, videos and web pages. This makes the timeline adaptable to the 21st Century tools our students already have access to. Additionally, more literacy-based activities can be connected to their use, as the space used by text is flexible (not fixed, as with a paper timeline). Another advantage of the digital timeline format is the ability to share electronically with other collaborators, with the teacher, and anyone else with a link. This allows multiple contributors, a cycle of review and revision, and other high-quality publishing activities to take place.
Most timeline apps have a wide variety of ready-made templates to choose from. I found the template I used in Sutori to be very helpful in designing a high-quality, rich timeline with a variety of interactive elements — ones I might not have considered, had it not been for the template’s suggestion.
A Walk-through of a Sutori Timeline: The Early History of Norwich, Connecticut
Working with digital timelines gives students excellent opportunities to practice important literacy skills:
Selection of a feature image: Students practice how to choose a cover image that adds to the story of their timeline.
Creation of a title: Students practice creating a title that captures the main idea of their story.
Development of an introductory paragraph: Students practice important summary skills.
Use of embedded tools: Students use embedded presentation and collaboration tools.
5
5. Image selection: Students must research to find time-appropriate images that add value to the text, for timeline events.
6. Labeling of timeline entries: Students practice writing timeline labels that capture important historical events.
7. Evaluation and selection of appropriate sources, with proper links to all resources: link to high-quality source is provided, for further information.
8. Giving and receiving appropriate feedback, through comments link.
9. Writing informational text: Students create concise explanatory text to accompany images and explain relevance of timeline events.
10. Creation of Subheadings: Brief subtitles (with dates) that help the viewer navigate the presentation, and that are appropriate for the timeline section.
11. Use of sidebars: Use of embedded “Did You Know?” module allows student to include fun facts, explanations of terms and other interesting information.
12. Connection to known landmarks: Use of images and information about commonly known, local landmarks helps viewer connect with the presentation, and helps establish connection between big historical events and local history.
13. Identification of necessary background knowledge: The embedded Video module allows the student to include videos of any length, to help the viewer understand the content better.
14, 15. Use of interactive elements: The students can engage the viewers by including interactive elements, such as the Quiz module, which can provides feedback to the responder.
16. Connection to famous locals: Including famous people from the area helps viewers see connection between “big” history and their own region.
17. Use of embedded digital media: Students can embed Google Docs, Canva infographics (such as the one shown), Flickr albums and a wide variety of other media, using the embedded tools. This allows showcasing of other student work in the timeline, allows students to customize their timeline and adds viewer interest.
18. Development of discussion questions: By using the Forum module, students can identify and include compelling questions that lead to classroom discussions.
19. Selection of graphic aids: Students can include a variety of graphic aids, including paintings, portraits, photographs, drawings, maps, and charts, as the content dictates. Here, the map of the trolley line includes local street names, so students can see where trolleys once ran in their hometown.
20. Making connections across time periods: By including connections to today in their concluding paragraphs, they show the relationship between past events and the way history unfolded up to the present day.
21. Proper citation of digital sources: The bibliography modules in the template allow for students to include properly cited digital resources used in their stories.
22. Use of hyperlinks: Students practice correctly hyperlinking their sources to the correct webpage.
23. Sharing of toolsand techniques: As a consultant, I was always taught to debrief not only the content I presented, but the strategies and tools I used, as well. Giving students the opportunity to share the tools they used with others fosters a spirit of collaboration.
Student products. We have gone over in detail how digital timelines are an excellent way for students to “show what they know.” Consider using them as a replacement for essays, reports and other research projects.
By Teachers…
Stand-alone presentations: Teachers can develop stand-alone lessons using the timeline (don’t forget – Sutori has other “story” options, as well!). In presentation mode, each element is displayed, one at a time, making the timeline more like a PowerPoint presentation.
Organization of units of study: The timeline can be used as an outline for a unit of study, with each element representing a lesson within the study. Lesson material (Google Docs, videos, PowerPoints, etc.) can be linked via the embedded linking tools. The subheadings are available on the sidebar to the left, for easy navigation between components.
Try Making a Timeline!
I have always used PowerPoint to organize my lessons in science and social studies. After playing around with Sutori, I can’t wait to start using it for my lessons, instead! I’d love to hear how you have used digital timelines with students. Share!
Teaching Big Ideas to a Class with Diverse Learning Needs
General educators and special educators, alike, daily face a dilemma: how do I teach high-quality, grade-level content ideas when my students have such varied learning needs and abilities?
So often, students who struggle are given a watered down version of the content, rather than the same content, taught in a different way. Similarly, students who excel are often given the same content, but given less support in learning it, as the only “enrichment.”
Using thinking maps enables a classroom teacher to deliver grade-level content, involving higher-order thinking, in a format that is understandable and accessible to the greatest number of students in the classroom.
Thinking maps are visual representations of higher-order thinking skills: defining in context, classifying, describing, comparing, sequencing, showing cause and effect, illustrating analogies and demonstrating part-to-whole and whole-to-part relationships. By using a distinct visual representation for each skill, and limiting the types of graphic representations used, students can master not only the use of the organizer, but the represented skill, as well.
Thinking Maps (Hyerle and Yeager, 2007) are distinct graphic representations of eight major higher-order thinking skills.
What is a Circle Map?
In 2007, Hyerle and Yeager described eight visual tools that could be used to show important relationships in any subject area. A circle map is one of these major thinking maps. It is used to define big ideas, such as the Industrial Revolution, institutionalized racism, or the Fourth Amendment, in context.
The basic structure of a circle map.
In the example, below, a Circle Map is used to define the concept of “storm.” The first circle contains the concept word, which is surrounded by another circle with vocabulary words used to define what a storm is. On the outside, are examples of the concept, from literature and the students’ experiences.
A primary grade example of the use of the Circle Map, to define the concept of “storm.”
I first saw a Circle Map used with adult learners in a session about cultural awareness. The concept being defined in context was the Declaration of Independence. The question being asked was, “Who did the Founding Fathers refer to when they stated, ‘All men are created equal?'”
In the center was the term, Declaration of Independence. The first circle contained a brainstorm description of the types of individuals who were the writers of the document: white men, men of European descent, English citizens, landowners, many of them lawyers, rich by that day’s standards, learned, Christian, The outside area listed other groups of people present at the time of the writing: indigenous peoples, poor, indentured servants, African slaves, people who didn’t own land, citizens from other countries (France, Germany), women, non-Christians, uneducated.
After the creation of this map, the participants discussed the question, “Who did the Founding Fathers refer to when they stated, ‘All men are created equal?'” They used the Circle Map and the difficulties faced by the groups on the outside, then and today, as discussion points.
Using a Circle Map in Connecticut History: The Millionaires of Norwich
I recently developed a series of lesson tools on the Millionaires’ Triangle, an area of Norwich, Connecticut that once served as the seat of Connecticut government (during the Civil War), and which was settled by some of the richest, most influential people in New England, during the early days of the colonies and the country.
As I read about the prosperity and philanthropy of these individuals, whose wealth rivaled that of the Rockefellers in history, I wondered to myself how far the influence of these individuals actually stretched. I used a circle map to show their reach.
I created a Circle Map in Canva, which ended up as an infographic. Although at first glance it looks more like a Bubble Map, the information is actually in concentric circles, and only surrounded by “bubbles” as a visual aid for the graphic.
An embellished Circle Map, showing graphically the influence of the millionaire founders of the city of Norwich, Connecticut. {Image credit: (c) 2019, Kim M. Bennett}
The concept to be defined, in context, is the influence of the millionaires in the Millionaires’ Triangle of Norwich (center, black circle). Using historical documents and online research, I gathered information about the businesses and government involvement of these founding fathers and mothers of Norwich, and the charitable foundations they established during the 18th and 19th centuries.
Surrounding the concept circle, I broke the information into two concentric circles, instead of a single one. The inner circle represents the major industries where the Millionaires had direct influence, through ownership or through major financing of the venture (white circles). The next layer represented the detail of the various groups of people directly affected by the ventures of the Millionaires, through their companies, their foundations and other philanthropic dealings (green circles).
In the area outside the circles, I wanted to list those groups who were explicitly absent from the influence of the Millionaires, or whose livelihood was in direct conflict with the activities of these individuals. The fact that the entire area now covered by the city of Norwich was once Mohegan Burial Ground, makes the Mohegans an important addition to the outside region of the map.
Circle Maps are not meant to be static. I could easily add “non-servant immigrants” to the outside area. If the only immigrants helped by the ventures were ones employed by the Millionaires, that would be an important fact to add. The Narragansetts were also in the region, and had a very different relationship with English settlers – they could be added to the outside area, as well. The point of a Circle Map is to give the student a better understanding of the key concept, by providing background information that helps define it for that situation, and to be used as a starting point for conversation.
A Circle Map can then be used to generate questions:
What about immigrants who weren’t employees? Where were they?
What happened to the Mohegan residents of the area that is now Norwich?
Is the area still influenced by the early founders? In what ways?
Did Uncas make the right choice for the Mohegans to work with the settlers?
Did the Narragansetts fair better, by opposing the settlers?
What happened to the foundations and businesses of the Millionaires? What still exists, today?
Using Circle Maps in Your Classroom
I would love to hear from you to see how you’ve used Circle Maps with your students. In the comments, write a link to your photo or post, let us know the grade, subject and important concept being defined. Thanks!
Social studies classes can be challenging for many students. Often, the content is text-based, which is daunting for students who struggle with grade-level reading. Response work is usually written, and, quite frequently, takes the form of research projects or essays – an added hurdle for many students. In addition, the topics are often from the distant past, and students have difficulty connecting them to their present life.
Students who are challenged by literacy-based learning tasks can still be actively engaged in high-quality, grade-level learning tasks, if we do two things:
Make the task more accessible (by controlling the language demands); and
Increase the interest level (by making the content and format more relevant to the students).
Facebook photo albums can be a way for students to share their history learning with others.
Facebook Photo Albums as Response Work
In a world where kids have more technology in their pockets than most teachers do in their classroom, it seems silly to ignore how adept today’s kids are in the electronic world. While many of their teachers are “digital immigrants,” they are, indeed, “digital natives,” many learning to “swipe left” before they even reach school age.
While we want to encourage kids to be well-balanced in their use of their electronic devices, it pays to think about the world they live in when we design response projects. True example: I have three boys, ages 32, 29, and 15. That’s right – there are 14 years between the last two boys, who both had the same 3rd grade teacher. I was disappointed to see that, 14 years after my middle child was in 3rd grade, the teachers were still using the same projects, the same books and the same strategies as they had with #2 son.
Enter social media. Now, I know that 1) my kids use social media platforms that I know little about and 2) they insist that Facebook is for “old people” now. But they all are familiar with Facebook, and it’s been around long enough to have a well-developed suite of tools that can be used in many ways in the classroom.
I do a lot of family history and geneology work. Whenever I can, I find authentic photos of people, places and events to add to my Ancestry.com work, and share them with my family by creating photo albums on Facebook. It occurred to me that Facebook photo albums would make a great vehicle for students to share their learning:
capturing part of the message in an illustration provides scaffolding for students who struggle with print media;
creating a caption allows for students to practice summarizing;
use of Internet content gives students an opportunity to learn how to give credit to other people’s work;
albums can be shared among different people as a group project.
Instruct students to find photos of historical individuals, places and events, to tell important social studies information.
The Millionaires’ Triangle, Norwich, Connecticut
Recently, I created a walking tour of Norwich, Connecticut, that circles the Chelsea Parade Park and passes by Norwich Free Academy. Using online photos and content, I created a Facebook photo album that can serve as a virtual travelogue for the Millionaires’ Triangle Trail.
Each photo album entry contains the following:
The stop number, with an image of a stop along the trail (I used Internet photos, but you could take your own photos, if you wish);
A description of the photo, which includes the stop number, the name of the famous person who lived there, the year the house was built and the architectural style, and the address of the site or home (since it’s a walking tour);
A brief summary of the life of the family who lived there, including the source of their fortune;
A tag identifying the location;
When needed, an image credit (many of the photos are part of the historical record of the town).
The stops are in order, so that the album can actually be used to conduct a walking tour.
Historical maps and other figures, properly cited, can be helpful additions to a Facebook photo album in the history class.
Tips for Integrating Social Media in the Classroom
Using Facebook in school isn’t like using it at home:
consult with your administrator first, before setting up a page;
create a class or school Facebook page – don’t use your own account or a student account;
use photos of historical people, places and things, only – don’t include photos of the children;
consider setting your account so that comments are not allowed;
make your page by invite only, and set the privacy so that only current families (not the students) have access — remove access once families are no longer part of your classroom.
When you set students out to find images for the photo album, provide guidelines to help them choose well:
What important information does this image tell the reader about ______?
Is this the BEST image to give that message?
What information do I have to include in the caption, so my image stands alone?
What order do we have to put the images in, to tell the story properly?
Give students guidelines and practice Internet safety when using social media in the classsroom.
Social Media in YOUR Classroom…
How have you used social media in the classroom? Share the best of the best with us, in the comments below – add a link so we can visit and comment!
I’ve been an educator for 35 years. Over the course of my career I’ve had the following teaching assignments (in order):
Working in the school garden as a STEM Coach. {Image Credit: (c) 2014, Kim M. Bennett}
Agricultural Educator
Intern at the Northeast Career Center and the Ohio School for the Deaf, and area elementary schools in Columbus, Ohio, as an agricultural educator;
Graduate Teaching Assistant, teaching non-majors introductory horticulture and plant identification classes at The Ohio State University;
Adjunct Instructor, teaching vocational agriculture to non-degree students at the Ratcliffe School of Agriculture at the University of Connecticut;
Trainer and Instructor, teaching Home Depot garden center employees introductory horticulture in the Northeastern United States.
My first Clinical Day Treatment School classroom. {Image Credit: (c) 2018, Kim M. Bennett}
Early Childhood Educator
Preschool teacher, working with 3- and 4-year-olds at the Willington Nursery Cooperative in Willington, Connecticut;
1:1 Educational Assistant, working with a student with multiple disabilities at Center Elementary School in Willington, Connecticut;
Special Education Paraprofessional, working with 1st through 3rd grade students with mild to moderate disabilities at Center Elementary School;
Kindergarten Paraprofessional, Center Elementary School;
Dual Language Teacher, working with 3rd grade students in the Companeros Program at North Windham Elementary School in Willimantic, Connecticut.
Educational Consultant
Education Consultant and Team Coordinator, Early Intervention and Teaching and Learning Projects, State Education Resource Center, Middletown, Connecticut;
Independent Education Consultant, working with educators nationwide, at Northside Consulting.
A presentation on vocabulary centers for 6th grade teachers. {Image Credit: (c) 2012, Kim M. Bennett (A Child’s Garden)}
Homeschooler
Homeschool teacher/assistant principal/chief cook and bottle washer, Grades 1-10… on to 11th grade next year…
STEM Coach and Consultant
STEM Consultant, New London Public Schools, working with grades K-12;
STEM Coach, Winthrop STEM Elementary Magnet School, New London, Connecticut, working with educators and students in grades K-5.
My current Clinical Day Treatment School classroom. {Image Credit: (c) 2018, Kim M. Bennett}
Special Educator
Special Ed intern at York Correctional Institution and Carl Robinson Correctional Institution, working with adults with disabilities in all content areas;
Literacy tutor at CRCI, working with adults with reading disabilities;
Special Educator, working at Natchaug Hospital, with students grades 6-12 in an alternative, clinical day treatment setting for students with emotional, mental health and addiction issues.
It’s taken me a long time, but I know the place where I currently roost is where I’m supposed to be. It’s my favorite position of all my time as an educator.
Saturday homeschool… because the teacher was out sick without a sub for three days. {Image Credit: (c) 2014, Kim M. Bennett}
What I’ve Learned About Teaching
Here are 35 things I learned over 35 years of being an educator – in no particular order.
If you want the pruners put back in the right place, trace their outline onto the pegboard with a Sharpie. Label the outline, “pruners.”
Parents do the best they can with what they have.
Some teachers get a “loaded” classroom, because those kids deserve the best instruction.
It’s really okay to say that you don’t want to teach anymore.
Teachers don’t like having new curriculum materials every two years. It makes them feel like new teachers all over again.
All of us (kids and adults) learn new ideas better when we start with concrete objects.
Incarcerated adults love succeeding at school.
Some kids swear and act out because that’s the only power they feel like they have.
Loving your students is a bittersweet part of the job.
Being a second-language learner means you know one more language than most Americans – and that’s a strength.
Rubrics are great for teaching, learning and assessment.
Kids with behavior problems aren’t used to hearing about their strengths.
People who are white can never really understand what it’s like to be a student of color in America.
Teaching teachers is harder than teaching students of any age.
When looking at data, there’s always a story behind the numbers.
“Homeschool” isn’t “school at home.”
Many kids learn just fine when they’re “unschooled.”
Kids become attached to their teacher.
New teachers sometimes need a shoulder to cry on, a reminder to eat, and chocolate.
Teacher’s guides are not meant to be followed cover to cover.
Little kids can understand big numbers – and we should let littles work with them.
Elementary and Special Ed teachers need more confidence in science and math.
Social studies = the forgotten subject in elementary schools.
Finding a restaurant in the phone book is not an easy task for many students with disabilities.
Teens find it more fun to swear in English than in their first language (whether Spanish, Creole or American Sign Language).
It’s easier to remember scientific names if you set them to music.
Preschoolers and college students both need to be reminded to eat right and go to bed on time.
Stations and centers are fun for littles, teens and even adult learners (even though no one likes to call them “centers” with big kids).
All kids can learn to love going to the library.
Play is work for little kids.
A good record-keeping system makes a SpEd teacher’s life much happier.
For most kids, reading and writing happens spontaneously, when provided the right environment.
Teachers are historically underpaid for what they do in the United States.
Gifted and talented kids need specialized instruction, too.
Children will rise to meet the bar, however high (or low) you set it.
How About You?
What are some take-aways you’ve had, as an educator? Please share.
There has been a lot of talk in the news, on social media, and on the radio, about some of the comments made by prominent citizens in our country, on the subject of what it looks like to be a “real American.”
As most of us did, regardless of our own political and religious views, I reacted strongly to some of the messaging that I heard and saw.
A very wise friend of mine once told me, “If something upsets you, don’t do anything. Sleep on it. If you are still upset the next day, THEN do something about it.”
The next day, I was still aching, deep in my heart. But, being a teacher, I have learned that there is ALWAYS something to be learned, no matter how tragic, painful or even benign, the situation. So I set about trying to figure out what it was that I (ME!) needed to learn about what it was to be a REAL American.
The #RealAmericans Project
I created my own challenge, entitled #RealAmericans, and created a Facebook album to share as I learned (a Pinterest page will follow… stay tuned). I didn’t want it to be politically or religiously biased in any way, so I had to think hard about what messages I wanted it so give. Here are the messages I hope people hear/see from this project.
Diversity is a strength. I want the project to include Americans of all kinds, of all races, of all walks of life.
Love wins. No matter what the image, I wanted it to project a message of love. People might not agree with a political viewpoint, but they can’t disagree with love.
Real Americans spend their lives doing wonderful, ordinary, ground-breaking things. Diapering a toddler is as important as owning a company; tending an orphaned duck is as important as leading a protest. Running a classroom is as important as running a bank or running a marathon.
Everyone is my neighbor. Yes, even the ones I disagree with. Maybe even don’t like that well.
There is always a story behind the image. Images we see in the news are real people. With real, American stories.
Americans share common values. I want to include at least three photos from each of the 50 states and the protectorates of our country. At least one photo should show racial diversity. One photo shares a love theme.
If controversy arises in your classroom over what kids see in the news, instead of persuading them, challenge them to do their own #RealAmericans Project. Make sure that they include the story of the individual in the caption.
the person’s name
a brief description of the person’s role(s)
a statement about the person’s life.
the location of the photo
proper image credit
If you choose to do your own #RealAmericans Project, please link up the post or album in the comments section, below. Feel free to use the hashtags #RealAmericans and #DiversityisStrength. I would ask that you keep to the messages that I listed above, and keep the message positive and loving.
I’ve been a teacher for a long time. Music has always been a tool that I’ve used in my classroom, from pre-K through adult education.
I don’t want you to think I’m that magical teacher who started every day playing the piano or guitar and singing with my students. I HAVE done that before, but not everyone can play an instrument or sing. That doesn’t mean that you can’t use music to reach the students in your room.
Today, I wanted to share with you some tips for incorporating music into your daily or weekly routines, and some of the brain research into why you should especially consider it, if you’re working with students who have disabilities.
We all can relate to the effects that some music has on us, as people. But is there actual research on the effects of music on us? If so, what does it say? How can we use that in our teaching?
It improves our cognitive ability (especially if we learn to play an instrument);
It gives us a feeling of tapping into something bigger than ourselves;
It makes us feel happier;
It makes us feel closer to others (especially when we perform together)
It decreases our stress levels and increases heart health;
It helps us manage our moods;
It changes the way we see other people;
It makes the world seem more colorful;
It improves our vision (really!);
It’s something we are drawn too from birth.
Simple Ways to Incorporate Music into Your Daily Routines
As I said, music sneaks into my day regularly. Here are some ways to use it easily, organized by goal areas (I included BONUS homework activities – my students are notorious for not doing homework, but these ideas have worked for me year after year).
Song Lyrics as Poetry: My students often balk if I mention that we are going to do a poetry unit. When that happens, I use song lyrics to lead off the unit. Starting with familiar songs hooks the students, enabling me to then shift into classic pieces during the unit. {BONUS: My kids don’t like to do homework. But they WILL write down the lyrics to their favorite songs, especially if we are going to use them in class that week}
Mood and Theme in Literature: Last year, my class struggled with comprehension beyond the “right in your face” type. So I wrote common themes in literature on the Promethean board, then played familiar songs for the students, and asked them to identify the theme of the piece (this also works for mood). We discussed how the words and music each contributed to the meaning, much the way you would discuss the words and pictures in a picture book. {BONUS: I gave the kids homework assignments to come to school the next day with a song that fit a particular theme or mood}.
Academic/Cognitive ~ Math
Fractions: With students who have an ear for music, and maybe know how to play an instrument or read music, I’ve used note values to help them understand the fractions whole, half, quarter, eighth, sixteenth, and even thirty-second. Here is an online guitar lesson that has audio clips of the various note values.
Study Skills
Transitioning into the School Day: One year, I had a very rowdy group, which, ironically, also included a child with agorophobia for whom just entering the classroom was difficult, especially when it was noisy. The way the class came into the building set the (unfortunate) tone for the rest of the morning. Out of desperation, I started playing smooth jazz on my Promethean board, using my Pandora account. The kids entered the building, and said, “Ooh. What’s that?” They entered the room head-bobbing and snapping their fingers – very silly – but 1) got into the room and 2) sat down to work.
Focus Aids: Over the years, my kids have asked for music to help them focus when they write, or when they are doing independent work. NOTE: I stick to music without lyrics, as the lyrics are often a distraction. My kids usually ask for piano music.
Self-calming #1 ~ Music Contracts: In a previous school, we issued music contracts to students who requested music as a calming or focus aid. Students had to show that they were able to use the aid responsibly (e.g., work got done, the equipment was used and cared for properly, students turned off the devices when asked). We purchased inexpensive MP3 players (without wi-fi or internet capabilities) for each student, and ear buds. We then asked the students to list music they wanted to have on the MP3 player, and one of the staff members found “clean” and school appropriate versions of the songs, and loaded each students MP3 player. {BONUS: the music list can be sent home for homework}
Self-calming #2 ~ Mood Reset: In a behavioral health setting, disruptive behavior happens. And it affects the rest of the group, because “everybody’s here for a reason.” One year, when I had quite a few “internalizers,” if there was too much tension, the students would ask to turn off the lights, put their heads down, and listen to music for 5-10 minutes, to get themselves back in order. It was good for all of us.
Motor Break: Once in awhile, you get that kid that has to move periodically, to get the sillies or fidgets out. One of my students was given the strategy to go to the back of the room and “dance it out.” He was an excellent dancer, and would do a quick 30-second “Fortnite” dance to get himself refocused (dancing to music inside his head). We got so used to it, and he used it so appropriately, that no one paid him any mind.
Communication
Listening: When you work with students with behavioral health or cognitive issues, many will have IEP goals about following directions. Kids with ODD (Oppositional Defiant Disorder) will hear your voice and automatically want to do the opposite, no matter what you’re saying. So, I’ve “tricked” kids into learning how to listen and follow directions by using music as a hook, by having them listen for a particular thing (a word the singer uses to describe his love, the instrument that sets the tone of the piece, the way the writer uses dynamics to surprise you…), then write it down.
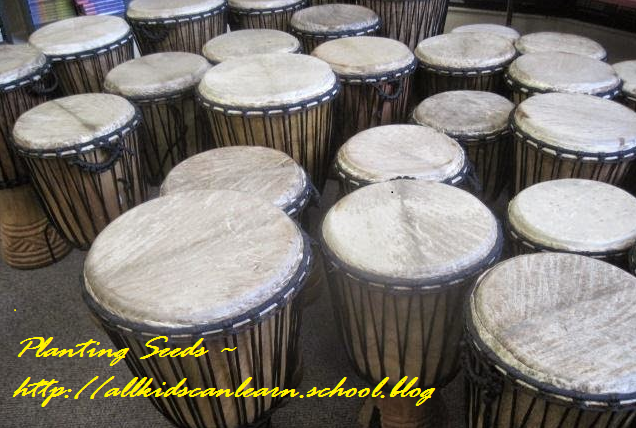
Coordination and Strength: Kids on certain medications (especially psychotropic ones) have difficulties with their weight, overall energy levels, and, sometimes, coordination. Some kids’ disabilities, themselves, affect their muscle tone. All of these things make physical activity unpleasant for a lot of kids – especially teens, who might not be physical activity fans, anyway. In the past, we’ve had success engaging every one of our kids when we had a drum circle. It’s communal, it’s loud, and they get to bang on stuff – with permission! It also helps them with listening and timing.
Transition
Playing Music as a Pastime: When we were cleaning out an old room to turn it into a classroom, we found several keyboards. No one wanted them in their rooms, so my assistant and I took two of them. We set them up near one of the Promethean boards, and found videos on keyboard playing for beginners. Two of my students as to play the keyboards during activity period, every day. Identifying a hobby is an important part of transitioning into adulthood {NOTE: we hide the power cords when we don’t want the keyboards to be a distraction!} .
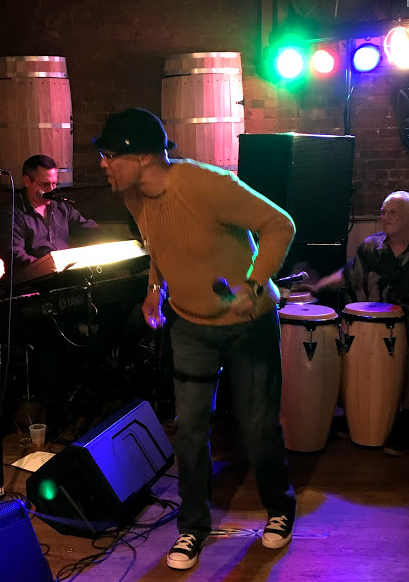
Identifying Strengths: As part of our community meetings, our principal used to set up karaoke, and have open mic times. One year, a new student stepped to the mic and sang the popular song, “Location.” He sounded just like the actual singer! He didn’t realize that he sang as well as he did. Another student would play her ukelele and sing. It was good for the kids to realize they had strengths, and good for their peers to see them in a different light.
Other Ways to Use Music
I know that I focused more on older students in this article. In my experience, it is way easier to get younger students involved in music activities. It’s when students hit the teen years that they become self-conscious and withdrawn. I love to sing and play music, but, as I said, I am NOT the teacher who is drawn to performing in the classroom. The above activities were comfortable for ME, too.
Do you use music in your special education classroom? Let me know in the comments section.
Meet My Musical Family
A little about me and my family:
There are a lot of musicians in my family. Basically, we are our own band:
My husband is a professional drummer… my eldest son plays the clarinet and saxophone… my middle and youngest sons play the trombone… my youngest son also plays the drums… I sing, and play guitar and violin. My mom passed on her musical genes to me. My husband has professional musicians (a bassist, a saxophone player, singers) in his family, and inherited his musical abilities from his mom, too.
So this article touched my soul… I wanted to share some photos of my family, making music. Enjoy!